Eastlake Washstand Rebuild ~ Whitewash Paint Makeover
- Melissa Geskie
- May 31, 2019
- 5 min read

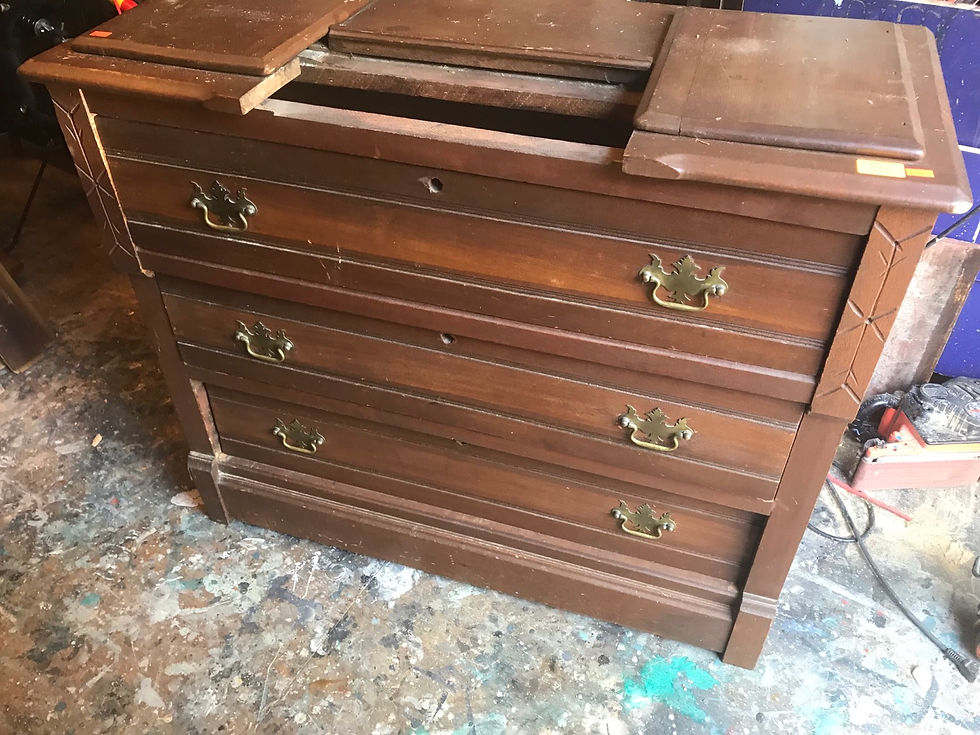
I purchased this vintage washstand from a online auction sight unseen. I knew that many wash stands are priced low due to the tops being damaged or broken. This washstand was not missing any top pieces but I know that I would be replacing the top. A old style washstand usually has broken or missing parts due to the marble insert. Back in the days of no running water people would use these to place a washbowl on top and bathe and wash from the stand. Wood would get wet, warp and break.
Supplies Needed
-Basic Tools
-Spray bottle with water
-Paper Towels
-Paint Brushes and Rags
-Sandpaper
-Wood Glue
First steps to repair this washstand was to remove the top uneven levels. I used a mallet to remove the pieces of wood. and a crowbar when necessary.


After removing the top and assessing the piece I discovered that the back was wood slats and the wood pieces were not secure. I removed the wood slats and used my drill to install screws to secure the frame. I kept one board in the middle to help strengthen the base. I then measured the back and top to have new pieces cut to size. These will fit on the back of the washstand top to bottom to sturdy up the piece.
It's easy to fix the wobbly problem that many old dressers have happening. The cause is loose joints and a loose backing. I took the wood panel pieces, in this case two parts and installed them onto the back with my drill. Checked the frame of the dresser in insure it was sturdy and strong. Boards can be cut to size for a fee at any local hardware store like LOWE'S or HOME DEPOT.

After the back was installed I was ready to make a new plank wood top. I had measured and purchased the boards at Lowes and cut them to size using my chop saw at home. I
wanted the boards to sit flush at the back of the dresser, and over hang a bit on the front and sides. After measuring and cutting the planks, I laid out my pattern on top
of the dresser. It took a bit of rebuilding with scrap wood to make the top sit even, but after minor repair work it was ready to be installed.


I take each piece of plank wood and sand down the sides and edges so they are not rough. I also sand the top lightly to make sure there are not slivers or wood that is rough. Then its time to distress. Since the age of this washstand is turn of the century and I am planning a whitewash finish I needed to age the planks. I used screws, hammer and screwdriver to achieve this effect. Go ahead and bang up the planks, hammer and poke them to give them some character.


Now it's time to stain the boards. Using Dixie Belle No Pain Gel Stain in Espresso I wiped on the color. Make sure to cover the edges and sides as well as the top. By staining before you install you are able to get in between all the cracks and crevices that would be a harder job if the planks were screwed down. Wait for the stain to dry.
After the stain has dried you are ready to install. Place your planks onto the top of the washstand and make sure to measure for even over hang on the front and each side. I like to use painters tape to hold down the boards when I'm drilling the holes. I drilled and prepped the holes get ready secure down. I like to use screws that are already black, so that the rustic vibe looks good against the boards. I used Dixie Belle Gator Hide to protect the finish and stain. I applied with a brush to cover all the wood tops and sides.

Once you have secured your boards, and back you are ready to prep for paint! I know that this prep work seems tedious, but trust me if I can do it - you can too! A year ago I had never even picked up a power tool. Now I'm able to rebuild a whole dresser!


Inspect each drawer to make sure the joints are secure and sturdy. These drawers were clean and in good condition. The only thing was the missing key holes. At one time the original key hole would have had a wood mould on top of the metal key hole, the original seems to have been broken off along the way somewhere. I added new moulds (Made with Iron Orchid Design Moulds) and glued them on with wood glue. Since the plan is to whitewash I needed them the same tone in case some original color peeks through so I painted them brown. Remove the existing hardware and you are ready to paint!


A white wash is a simple look that highlights detail on wood. I love the age, dings and dents on this piece and wanted them to show. The joints on the drawers tells me that this washstand was made around 1900 or earlier. Knapp joints were constructed and used around this time frame. The style of wash stand is called Eastlake. It's part of the late Victorian period and usually has carved out details on front of the wood. This one has a snowflake design and carved fronts. By using a white wash technique I'm able to show the details when the paint sits in the groves.
To begin you will need some supplies. A roll of paper towels, brush, and spray bottle filled with water. I used the color Haint Blue by Dixie Belle. Its a beautiful off white with a hint of blue. Paint on a small section of paint in the direction of the wood grain, then spray with water. Wipe back the paint in the way of the wood grain. It allows the paint to sit inside the groves and still have the wood peek through. Complete the dresser in small sections so that it does not dry too quickly. Continue to wipe back the paint to achieve the desired look.

After your paint has dried you are ready to add the protective top coat. I used Clear Wax by Dixie Belle. I like to use a rag to wipe on the product and buff and to smooth it out. Using wax allows me to keep the wood peeking through and protect the paint.
You are ready to install your hardware. I used a farmhouse pull to make the look a touch more modern. The holes were the same as the new hardware and it was easy to line up. Put the drawers back in and your ready to stage!

As a added benefit I was able to reuse the back boards I removed. They have some great writing stamped on them and looked rustic. I cut them down to tray size using my chop saw and made a serving tray with the parts. The wood was in great condition I just oiled it and added some new hardware. I will add some felt pads to the marble piece I removed and make a cheese board. Get into the habit of saving your wood scraps, and parts. You never know what you will be able to create with them in the future.

Want to see a YouTube video for this project? Click HERE.
Shop Dixie Belle Paint HERE.


